

iPhone basics are easier than they look. This guide for beginners walks you through the 10 things every beginner needs: setting up, the buttons and swipes, calls, texts, apps, photos, the web, contacts, security and keeping your iPhone healthy. Each lesson uses plain steps that follow Apple’s iPhone User Guide, so you can work through it at your own pace, one lesson at a time.
📋 Quick Summary
- Most iPhones have no Home button: you swipe up from the bottom to go Home.
- Settings (the grey gear icon) is where almost every option lives.
- Install apps from the App Store. Touch and hold an icon to remove it.
- Set a passcode and turn on Find My before anything else.
- If something stops working, restart your iPhone first.
Table of Contents
Lesson 1: Set Up Your New iPhone
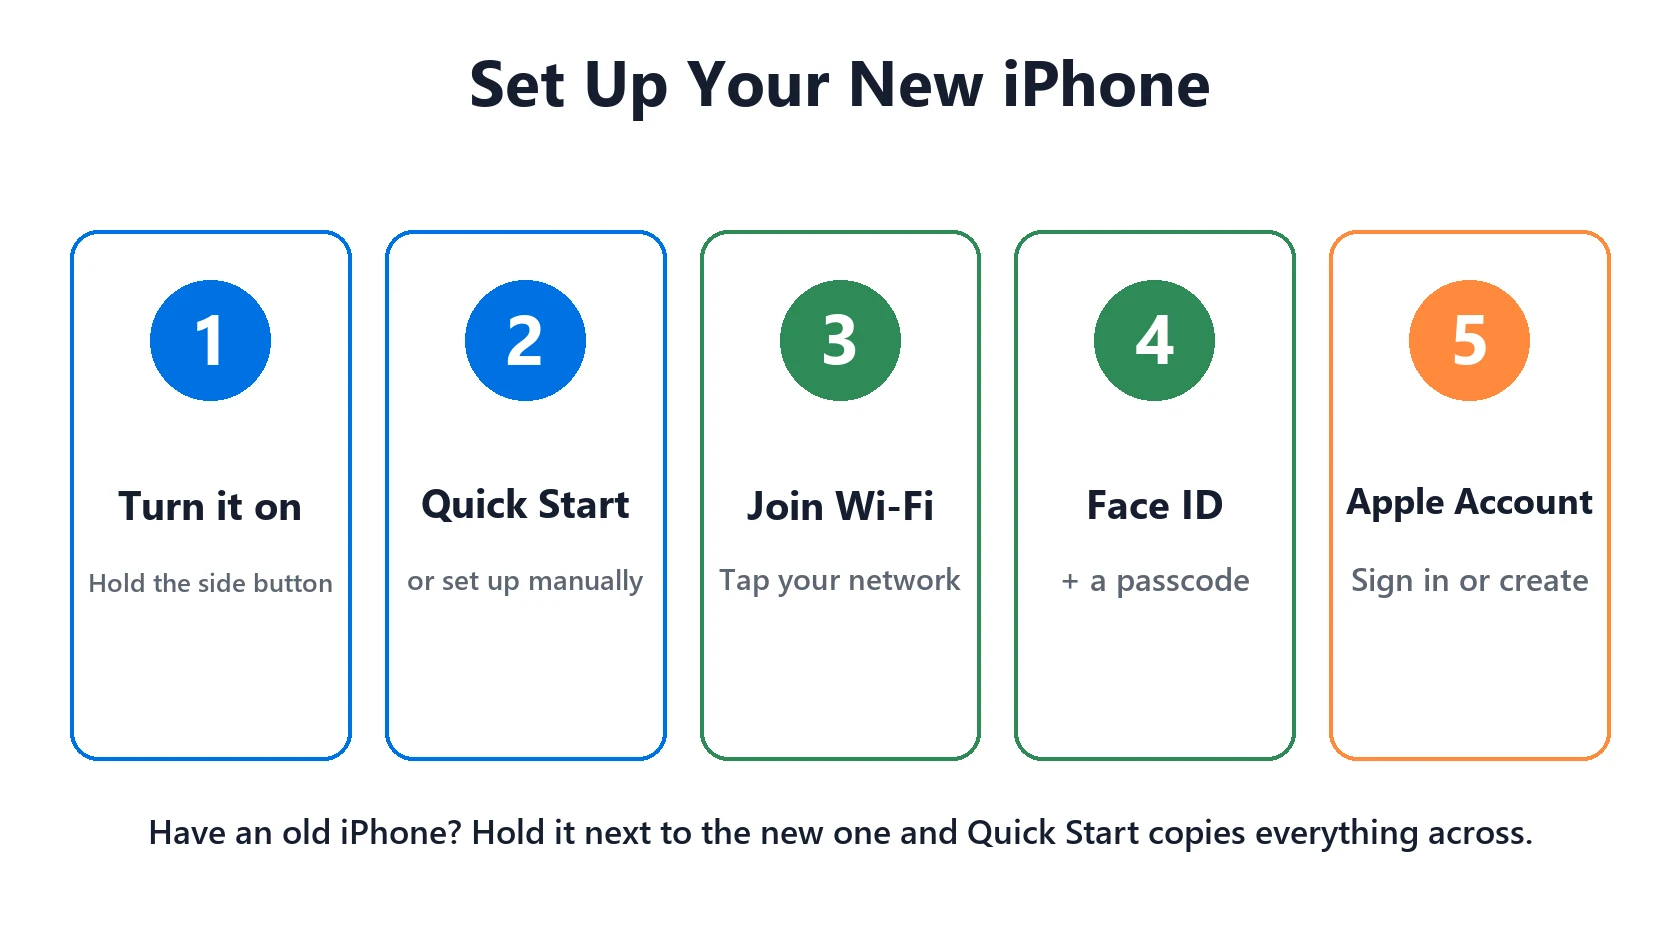
The first of the iPhone basics is getting it switched on. To turn on a new iPhone, press and hold the side button (on the right edge) until the Apple logo appears. The setup screens then walk you through the rest. Apple’s setup basics cover each screen, but here’s the order you’ll usually see:
- Pick your language and country.
- Use Quick Start or set up manually. If you have an old iPhone, hold it next to the new one and Quick Start copies your apps, photos and settings across. If it gets stuck, see iPhone Quick Start not working.
- Join Wi-Fi. Tap your network name and type the password.
- Set up Face ID (or Touch ID on models with a Home button) and create a passcode. Pick a passcode you’ll remember. Too many wrong tries can lock the iPhone.
- Sign in with your Apple Account, or create one. It’s what you use for the App Store, iCloud and Find My.
- Restore or transfer your data, then choose your settings and tap through to the Home Screen.
Not sure which iPhone you have? Our free iPhone model number lookup tells you from the model number, or see Apple’s guide to identifying your iPhone model.
Lesson 2: iPhone Basics for Buttons and Gestures
Most iPhones since the iPhone X have no Home button, so you control them with swipes. These iPhone basics work everywhere, in any app:
| To do this | iPhone with Face ID | iPhone with a Home button |
|---|---|---|
| Go to the Home Screen | Swipe up from the bottom edge | Press the Home button |
| See open apps | Swipe up from the bottom and pause | Double-press the Home button |
| Open Control Center | Swipe down from the top-right corner | Swipe up from the bottom edge |
| See notifications | Swipe down from the top of the screen | Swipe down from the top of the screen |
| Search your iPhone | Swipe down from the middle of the Home Screen | Swipe down from the middle of the Home Screen |
| Take a screenshot | Press the side button + volume up | Press the side button + Home button |
The buttons are simple too. According to Apple’s guide to the iPhone buttons and controls, the side button locks the screen and wakes it, and the volume buttons on the left change the volume. On older models a small Ring/Silent switch above them mutes the ringer. On newer models the Action button replaces that switch, and you can choose what it does in Settings → Action Button. Apple has more on taking screenshots.

Lesson 3: Make Calls and Check Voicemail
Open the green Phone app. Tap Keypad to dial a number, then tap the green call button. To call someone you’ve saved, tap their name in Contacts. Missed calls show in your recent calls list, and messages people leave are under Voicemail.
- Answer a call: tap the green button, or slide it if your iPhone is locked.
- During a call: tap Speaker to talk hands-free, or Mute to turn your microphone off. Use the volume buttons to make the caller louder.
- Set up voicemail: the first time you open Voicemail, your iPhone asks you to create a voicemail password and greeting.
If the caller can’t hear you or you can’t hear them, see iPhone speaker not working. If the top of the screen says SOS or No Service, see iPhone SOS or no service.
Lesson 4: Send Text Messages
Open the green Messages app and tap the compose button (a square with a pencil). Type a name or phone number in the To field, type your message at the bottom, then tap the blue arrow to send it. Tap the + button next to the text box to add a photo.
The bubble color tells you how it was sent. Blue bubbles are iMessages, sent over the internet to other Apple devices. Green bubbles are regular text messages (SMS or RCS), usually to Android phones. If iMessage won’t turn on, see iMessage waiting for activation. For green-bubble problems, see RCS messages not delivered.
Lesson 5: Install and Manage Apps
Apps are where the iPhone basics get fun. Apps come from the App Store (the blue icon with an A). Tap Search, type the app’s name, then tap Get (or the price). Your iPhone asks you to confirm with Face ID, Touch ID or your Apple Account password. The new app then appears on your Home Screen.
- Move an app: touch and hold an empty part of the Home Screen until the icons jiggle, then drag the app. Tap Done when you’re finished.
- Remove an app: touch and hold the app icon, tap Remove App, then Delete App.
- Check your space: go to Settings → General → iPhone Storage to see which apps use the most room.
You don’t need to close apps to save battery. iOS manages them for you. If an app freezes or keeps closing, see iPhone apps crashing. If there’s no room left, see iPhone storage full.
Lesson 6: Take and Edit Photos
Open the Camera app, or swipe left on the Lock Screen to open it straight away. Tap the white shutter button, or press a volume button, to take a photo. Swipe across the words above the shutter to switch between Photo, Video, Portrait and other modes.
Your pictures are saved in the Photos app. Open a photo and tap Edit to crop, straighten or adjust the light. Tap Done to save. Changed your mind? Edit it again and tap Revert to get the original back. Deleted photos go to the Recently Deleted album for 30 days, so you can recover them.
If the camera only shows a black screen, see iPhone camera black screen.
Lesson 7: Browse the Web With Safari
Safari (the blue compass icon) is the iPhone’s web browser. Tap the address bar, type a website or a search, then tap Go. Depending on your settings, the address bar is at the bottom or the top of the screen.
- Open several pages: tap the tabs button (two overlapping squares) to see your open tabs, or tap + for a new one.
- Save a favorite site: tap the share button, then Add Bookmark.
- Browse without saving history: in the tabs view, switch to Private.
- Make text bigger on a page: tap the page menu button in the address bar and use the A buttons.
If pages won’t load, check your connection first. See iPhone Wi-Fi keeps disconnecting.
Lesson 8: Add and Manage Contacts
Open the Contacts app (or Contacts in the Phone app) and tap +. Type a first name, last name and phone number, then tap Done. You can also add an email address, a home address and a photo.
To save a number that just called you, open Phone, find the call in your recent calls list, tap the info button (ⓘ), then tap Create New Contact. To change or delete a contact, open it and tap Edit. Contacts saved to iCloud appear on all your Apple devices.
Lesson 9: Security and Settings Basics
Almost every option lives in the Settings app (the grey gear icon). A few iPhone basics to set up early:
- Passcode and Face ID: Settings → Face ID & Passcode (or Touch ID & Passcode). If Face ID won’t recognize you, see Face ID not working.
- Find My: tap your name at the top of Settings, then Find My, and make sure Find My iPhone is on. It lets you locate your iPhone if it’s lost.
- Backups: tap your name, then iCloud → iCloud Backup, and turn it on. If it fails, see iCloud backup failed.
- Bigger text: Settings → Display & Brightness → Text Size.
- Wi-Fi and Bluetooth: both are near the top of Settings. Bluetooth connects headphones and car systems. See iPhone Bluetooth not working.
Forgot your passcode and see iPhone Unavailable? See iPhone Unavailable or Security Lockout.
Lesson 10: Updates, Battery and Quick Fixes
Keep your iPhone up to date. Updates fix bugs and security problems. Go to Settings → General → Software Update, as Apple explains. Plug in and join Wi-Fi first. Not sure whether to install the latest version? See should I update iOS.
For battery life, check Settings → Battery to see which apps use the most. Turn on Low Power Mode there when you’re running low (the battery icon turns yellow). Charge with a good-quality cable and adapter. If it charges slowly or not at all, see our battery and charging guide.
If something stops working, restart your iPhone first. On an iPhone with Face ID, press and hold the side button and either volume button until the slider appears, drag it, wait 30 seconds, then hold the side button to turn it back on (Apple’s restart steps). If the screen is frozen, Apple’s force restart is: press volume up, press volume down, then hold the side button until the Apple logo appears.
Still stuck? These guides cover the most common problems: iPhone won’t turn on, iPhone running slow, touch screen not working and iPhone won’t update. To check a repair price, try our iPhone repair cost estimator.
That’s the iPhone basics covered. Bookmark this iPhone for beginners guide and come back to any lesson when you need it, or share it with a friend or family member who’s new to iPhone.
Frequently Asked Questions
What are the iPhone basics every beginner should learn first?
Swiping up to go Home, opening Control Center, making calls and texts, installing apps from the App Store, and setting a passcode with Find My turned on.
Is an iPhone easy for beginners?
Yes. Once you know a few iPhone basics, like swiping up to go Home and finding options in Settings, most apps work the same way. Apple’s Tips app also shows short how-tos.
How do I go back to the Home Screen on an iPhone without a Home button?
Swipe up from the bottom edge of the screen. Swipe up and pause to see your open apps.
How do I turn my iPhone off?
On an iPhone with Face ID, press and hold the side button and either volume button until the slider appears, then drag it. On a model with a Home button, hold the side button.
Do I need to close apps on my iPhone?
No. iOS manages apps in the background. Only close an app if it freezes: swipe up and pause, then swipe the app’s card up.
What does the blue or green message bubble mean?
Blue is iMessage, sent over the internet to Apple devices. Green is a regular text message (SMS or RCS), usually to Android phones.
Where can I find the official iPhone manual?
Apple’s free iPhone User Guide is online at support.apple.com, and it’s also in the Tips app on your iPhone.
📚 Related Guides
Written by S M Momin Arif
Founder and lead writer at iPhoneFixDaily, writing practical iPhone troubleshooting guides checked against Apple’s official support documentation. Read more about our approach →


